This is an old revision of the document!
Table of Contents
WIRELESS ACCESS DEPLOYMENT
Deploy and Configure Wireless APs
Follow these steps to deploy and configure your wireless APs:
- Specify Wireless AP Channel Frequencies
- Configure Wireless APs
Specify Wireless AP Channel Frequencies
When you deploy multiple wireless APs at a single geographical site, you must configure wireless APs that have overlapping signals to use unique channel frequencies to reduce interference between wireless APs.
You can use the following guidelines to assist you in choosing channel frequencies that do not conflict with other wireless networks at the geographical location of your wireless network.
- If there are other organizations that have offices in close proximity or in the same building as your organization, identify whether there are any wireless networks owned by those organizations. Find out both the placement and the assigned channel frequencies of their wireless AP's, because you need to assign different channel frequencies to your AP's and you need to determine the best location to install your AP's.
- Identify overlapping wireless signals on adjacent floors within your own organization. After identifying overlapping coverage areas outside and within your organization, assign channel frequencies for your wireless APs, ensuring that any two wireless APs with overlapping coverage are assigned different channel frequencies.
Configure Wireless APs
Use the following information along with the product documentation provided by the wireless AP manufacturer to configure your wireless APs.
This procedure enumerates items commonly configured on a wireless AP. The item names can vary by brand and model and might be different from those in the following list. For specific details, see your wireless AP documentation.
To configure your wireless APs
- SSID. Specify the name of the wireless network(s) (for example, ExampleWLAN). This is the name that is advertised to wireless clients.
- Encryption. Specify WPA2-Enterprise (preferred) or WPA-Enterprise, and either AES (preferred) or TKIP encryption cipher, depending on which versions are supported by your wireless client computer network adapters.
- Wireless AP IP address (static). On each AP, configure a unique static IP address that falls within the exclusion range of the DHCP scope for the subnet. Using an address that is excluded from assignment by DHCP prevents the DHCP server from assigning the same IP address to a computer or other device.
- Subnet mask. Configure this to match the subnet mask settings of the LAN to which you have connected the wireless AP.
- DNS name. Some wireless APs can be configured with a DNS name. The DNS service on the network can resolve DNS names to an IP address. On each wireless AP that supports this feature, enter a unique name for DNS resolution.
- DHCP service. If your wireless AP has a built-in DHCP service, disable it.
- RADIUS shared secret. Use a unique RADIUS shared secret for each wireless AP unless you are planning to configure APs as RADIUS Clients in NPS by group. If you plan to configure APs by group in NPS, the shared secret must be the same for every member of the group. In addition, each shared secret you use should be a random sequence of at least 22 characters that mixes uppercase and lowercase letters, numbers, and punctuation. To ensure randomness, you can use a random character generator, such as the random character generator found in the NPS Configure 802.1X wizard, to create the shared secrets.
- RADIUS server IP address. Type the IP address of the server running NPS.
- UDP port(s). By default, NPS uses UDP ports 1812 and 1645 for authentication messages and UDP ports 1813 and 1646 for accounting messages. It is recommended that you use these same UDP ports on your APs, but if you have a valid reason to use different ports, ensure that you not only configure the APs with the new port numbers but also reconfigure all of your NPSs to use the same port numbers as the APs. If the APs and the NPSs are not configured with the same UDP ports, NPS cannot receive or process connection requests from the APs, and all wireless connection attempts on the network will fail.
- VSAs. Some wireless APs require vendor-specific attributes (VSAs) to provide full wireless AP functionality. VSAs are added in NPS network policy.
- DHCP filtering. Configure wireless APs to block wireless clients from sending IP packets from UDP port 68 to the network, as documented by the wireless AP manufacturer.
- DNS filtering. Configure wireless APs to block wireless clients from sending IP packets from TCP or UDP port 53 to the network, as documented by the wireless AP manufacturer.
Create Security Groups for Wireless Users
Follow these steps to create one or more wireless users security groups, and then add users to the appropriate wireless users security group:
- Create a Wireless Users Security Group
- Add Users to the Wireless Security Group
Create a Wireless Users Security Group
You can use this procedure to create a wireless security group in the Active Directory Users and Computers Microsoft Management Console (MMC) snap-in.
Membership in Domain Admins, or equivalent, is the minimum required to perform this procedure.
To create a wireless users security group
1. Click Start, click Administrative Tools, and then click Active Directory Users and Computers. The Active Directory Users and Computers snap-in opens. If it is not already selected, click the node for your domain. For example, if your domain is example.com, click example.com.
2. In the details pane, right-click the folder in which you want to add a new group (for example, right-click Users), point to New, and then click Group.
3. In New Object – Group, in Group name, type the name of the new group. For example, type Wireless Group.
4. In Group scope, select one of the following options:
- Domain local
- Global
- Universal
5. In Group type, select Security.
6. Click OK.
If you need more than one security group for wireless users, repeat these steps to create additional wireless users groups. Later you can create individual network policies in NPS to apply different conditions and constraints to each group, providing them with different access permissions and connectivity rules.
Add Users to the Wireless Users Security Group
You can use this procedure to add a user, computer, or group to your wireless security group in the Active Directory Users and Computers Microsoft Management Console (MMC) snap-in.
Membership in Domain Admins, or equivalent is the minimum required to perform this procedure.
To add users to the wireless security group
1. Click Start, click Administrative Tools, and then click Active Directory Users and Computers. The Active Directory Users and Computers MMC opens. If it is not already selected, click the node for your domain. For example, if your domain is example.com, click example.com.
2. In the details pane, double-click the folder that contains your wireless security group.
3. In the details pane, right-click the wireless security group, and then click Properties. The Properties dialog box for the security group opens.
4. On the Members tab, click Add, and then complete one of the following procedures to either add a computer or add a user or group.
To add a user or group
1. In Enter the object names to select, type the name of the user or group that you want to add, and then click OK.
2. To assign group membership to other users or groups, repeat step 1 of this procedure.
To add a computer
1. Click Object Types. The Object Types dialog box opens.
2. In Object types, select Computers, and then click OK.
3. In Enter the object names to select, type the name of the computer that you want to add, and then click OK.
4. To assign group membership to other computers, repeat steps 1-3 of this procedure.
Configure Wireless Network (IEEE 802.11) Policies
Follow these steps to configure Wireless Network (IEEE 802.11) Policies Group Policy extension:
- Open or Add and Open a Group Policy Object
- Activate Default Wireless Network (IEEE 802.11) Policies
- Configure the New Wireless Network Policy
Open or Add and Open a Group Policy Object
By default, the Group Policy Management feature is installed on computers running Windows Server 2016 when the Active Directory Domain Services (AD DS) server role is installed and the server is configured as a domain controller. The following procedure that describes how to open the Group Policy Management Console (GPMC) on your domain controller. The procedure then describes how to either open an existing domain-level Group Policy object (GPO) for editing, or create a new domain GPO and open it for editing.
Membership in Domain Admins, or equivalent, is the minimum required to perform this procedure.
To open or add and open a Group Policy object
1. On your domain controller, click Start, click Windows Administrative Tools, and then click Group Policy Management. The Group Policy Management Console opens.
2. In the left pane, double-click your forest. For example, double-click Forest: example.com.
3. In the left pane, double-click Domains, and then double-click the domain for which you want to manage a Group Policy object. For example, double-click example.com.
4. Do one of the following:
- To open an existing domain-level GPO for editing, double click the domain that contains the Group Policy object that you want to manage, right-click the domain policy you want to manage, such as the Default Domain Policy, and then click Edit. Group Policy Management Editor opens.
- To create a new Group Policy object and open for editing, right-click the domain for which you want to create a new Group Policy object, and then click Create a GPO in this domain, and Link it here.
In New GPO, in Name, type a name for the new Group Policy object, and then click OK.
Right-click your new Group Policy object, and then click Edit. Group Policy Management Editor opens.
In the next section you will use Group Policy Management Editor to create wireless policy.
Activate Default Wireless Network (IEEE 802.11) Policies
This procedure describes how to activate the default Wireless Network (IEEE 802.11) Policies by using the Group Policy Management Editor (GPME).
Membership in Domain Admins, or equivalent, is the minimum required to perform this procedure.
To activate default Wireless Network (IEEE 802.11) Policies
1. Follow the previous procedure, To open or add and open a Group Policy object to open the GPME.
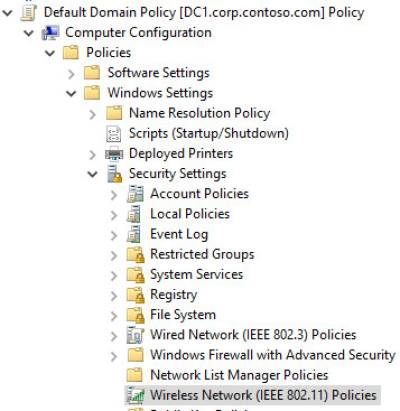
2. In the GPME, in the left pane, double-click Computer Configuration, double-click Policies, double-click Windows Settings, and then double-click Security Settings.
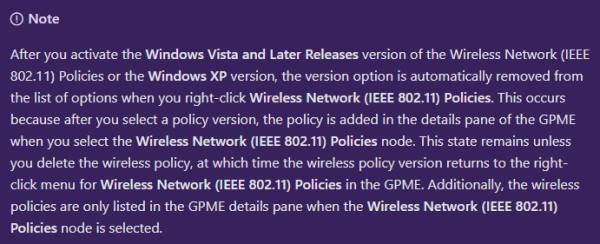
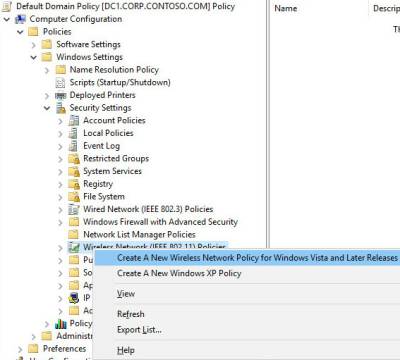
3. In Security Settings, right-click Wireless Network (IEEE 802.11) Policies, and then click Create a new Wireless Policy for Windows Vista and Later Releases.
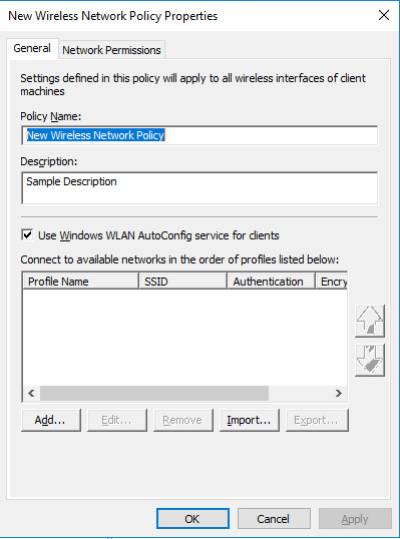
4. The New Wireless Network Policy Properties dialog box opens. In Policy Name, type a new name for the policy or keep the default name. Click OK to save the policy. The default policy is activated and listed in the details pane of the GPME with the new name you provided or with the default name New Wireless Network Policy.
5. In the details pane, double-click New Wireless Network Policy to open it.
In the next section you can perform policy configuration, policy processing preference order, and network permissions.
Configure the New Wireless Network Policy
You can use the procedures in this section to configure Wireless Network (IEEE 802.11) Policy. This policy enables you to configure security and authentication settings, manage wireless profiles, and specify permissions for wireless networks that are not configured as preferred networks.
- Configure a Wireless Connection Profile for PEAP-MS-CHAP v2
- Set the Preference Order for Wireless Connection Profiles
- Define Network Permissions
Configure a Wireless Connection Profile for PEAP-MS-CHAP v2
This procedure provides the steps required to configure a PEAP-MS-CHAP v2 wireless profile.
Membership in Domain Admins, or equivalent, is the minimum required to complete this procedure.
To configure a wireless connection profile for PEAP-MS-CHAP v2
1. In GPME, in the wireless network properties dialog box for the policy that you just created, on the General tab and in Description, type a brief description for the policy.
2. To specify that WLAN AutoConfig is used to configure wireless network adapter settings, ensure that Use Windows WLAN AutoConfig service for clients is selected.
3. In Connect to available networks in the order of profiles listed below, click Add, and then select Infrastructure. The New Profile properties dialog box opens.
4. In theNew Profile properties dialog box, on the Connection tab, in the Profile Name field, type a new name for the profile. For example, type Example.com WLAN Profile for Windows 10.
5. In Network Name(s) (SSID), type the SSID that corresponds to the SSID configured on your wireless APs, and then click Add.
If your deployment uses multiple SSIDs and each wireless AP uses the same wireless security settings, repeat this step to add the SSID for each wireless AP to which you want this profile to apply.
If your deployment uses multiple SSIDs and the security settings for each SSID do not match, configure a separate profile for each group of SSIDs that use the same security settings. For example, if you have one group of wireless APs configured to use WPA2-Enterprise and AES, and another group of wireless APs to use WPA-Enterprise and TKIP, configure a profile for each group of wireless APs.
6. If the default text NEWSSID is present, select it, and then click Remove.
7. If you deployed wireless access points that are configured to suppress the broadcast beacon, select Connect even if the network is not broadcasting.
8. Click the Security tab, click Advanced, and then configure the following:
a. To configure advanced 802.1X settings, in IEEE 802.1X, select Enforce advanced 802.1X settings.
When the advanced 802.1X settings are enforced, the default values for Max Eapol-Start Msgs, Held Period, Start Period, and Auth Period are sufficient for typical wireless deployments. Because of this, you do not need to change the defaults unless you have a specific reason for doing so.
b. To enable Single Sign On, select Enable Single Sign On for this network.
c. The remaining default values in Single Sign On are sufficient for typical wireless deployments.
d. In Fast Roaming, if your wireless AP is configured for pre-authentication, select This network uses pre-authentication.
9. To specify that wireless communications meet FIPS 140-2 standards, select Perform cryptography in FIPS 140-2 certified mode.
10. Click OK to return to the Security tab. In Select the security methods for this network, in Authentication, select WPA2-Enterprise if it is supported by your wireless AP and wireless client network adapters. Otherwise, select WPA-Enterprise.
11. In Encryption, if supported by your wireless AP and wireless client network adapters, select AES-CCMP. If you are using access points and wireless network adapters that support 802.11ac, select AES-GCMP. Otherwise, select TKIP.
12. In Select a network authentication method, select Protected EAP (PEAP), and then click Properties. The Protected EAP Properties dialog box opens.
13. In Protected EAP Properties, confirm that Verify the server's identity by validating the certificate is selected.
14. In Trusted Root Certification Authorities, select the trusted root certification authority (CA) that issued the server certificate to your NPS.
15. In the Select Authentication Method list, select Secured password (EAP-MS-CHAP v2).
16. Click Configure. In the EAP MSCHAPv2 Properties dialog box, verify Automatically use my Windows logon name and password (and domain if any) is selected, and click OK.
17. To enable PEAP Fast Reconnect, ensure that Enable Fast Reconnect is selected.
18. To require server cryptobinding TLV on connection attempts, select Disconnect if server does not present cryptobinding TLV.
19. To specify that user identity is masked in phase one of authentication, select Enable Identity Privacy, and in the textbox, type an anonymous identity name, or leave the textbox blank.
NOTE
- The NPS policy for 802.1X Wireless must be created by using NPS Connection Request Policy. If the NPS policy is created by using NPS Network Policy, then identity privacy will not work.
- EAP identity privacy is provided by certain EAP methods where an empty or an anonymous identity (different from the actual identity) is sent in response to the EAP identity request. PEAP sends the identity twice during the authentication. In the first phase, the identity is sent in plain text and this identity is used for routing purposes, not for client authentication. The real identity—used for authentication—is sent during the second phase of the authentication, within the secure tunnel that is established in the first phase. If Enable Identity Privacy checkbox is selected, the username is replaced with the entry specified in the textbox. For example, assume Enable Identity Privacy is selected and the identity privacy alias anonymous is specified in the textbox. For a user with a real identity alias jdoe@example.com, the identity sent in first phase of authentication will be changed to anonymous@example.com. The realm portion of the 1st phase identity is not modified as it is used for routing purposes.
20. Click OK to close the Protected EAP Properties dialog box.
21. Click OK to close the Security tab.
22. If you want to create additional profiles, click Add, and then repeat the previous steps, making different choices to customize each profile for the wireless clients and network to which you want the profile applied. When you are done adding profiles, click OK to close the Wireless Network Policy Properties dialog box.
In the next section you can order the policy profiles for optimum security.
Set the Preference Order for Wireless Connection Profiles
You can use this procedure if you have created multiple wireless profiles in your wireless network policy and you want to order the profiles for optimal effectiveness and security.
To ensure that wireless clients connect with the highest level of security that they can support, place your most restrictive policies at the top of the list.
For example, if you have two profiles, one for clients that support WPA2 and one for clients that support WPA, place the WPA2 profile higher on the list. This ensures that the clients that support WPA2 will use that method for the connection rather than the less secure WPA.
This procedure provides the steps to specify the order in which wireless connection profiles are used to connect domain member wireless clients to wireless networks.
Membership in Domain Admins, or equivalent, is the minimum required to complete this procedure.
To set the preference order for wireless connection profiles
1. In GPME, in the wireless network properties dialog box for the policy that you just configured, click the General tab.
2. On the General tab, in Connect to available networks in the order of profiles listed below, select the profile that you want to move in the list, and then click either the “up arrow” button or “down arrow” button to move the profile to the desired location in the list.
3. Repeat step 2 for each profile that you want to move in the list.
4. Click OK to save all changes.
In the following section, you can define network permissions for the wireless policy.
Define Network Permissions
You can configure settings on the Network Permissions tab for the domain members to which Wireless Network (IEEE 802.11) Policies apply.
You can only apply the following settings for wireless networks that are not configured on the General tab in the Wireless Network Policy Properties page:
- Allow or deny connections to specific wireless networks that you specify by network type and Service Set Identifier (SSID)
- Allow or deny connections to ad hoc networks
- Allow or deny connections to infrastructure networks
- Allow or deny users to view network types (ad hoc or infrastructure) to which they are denied access
- Allow or deny users to create a profile that applies to all users
- Users can only connect to allowed networks by using Group Policy profiles
Membership in Domain Admins, or equivalent, is the minimum required to complete these procedures.
To allow or deny connections to specific wireless networks
1. In GPME, in the wireless network properties dialog box, click the Network Permissions tab.
2. On the Network Permissions tab, click Add. The New Permissions Entry dialog box opens.
3. In the New Permission Entry dialog box, in the Network Name (SSID) field, type the network SSID of the network for which you want to define permissions.
4. In Network Type, select Infrastructure or Ad hoc.
5. In Permission, select Allow or Deny.
6. Click OK, to return to the Network Permissions tab.
To specify additional network permissions (Optional)
1. On the Network Permissions tab, configure any or all of the following:
- To deny your domain members access to ad hoc networks, select Prevent connections to ad-hoc networks.
- To deny your domain members access to infrastructure networks, select Prevent connections to infrastructure networks.
- To allow your domain members to view network types (ad hoc or infrastructure) to which they are denied access, select Allow user to view denied networks.
- To allow users to create profiles that apply to all users, select Allow everyone to create all user profiles.
- To specify that your users can only connect to allowed networks by using Group Policy profiles, select Only use Group Policy profiles for allowed networks.
Configure your NPSs
Follow these steps to configure NPSs to perform 802.1X authentication for wireless access:
- ItemRegister NPS in Active Directory Domain Services
- Configure a Wireless AP as an NPS RADIUS Client
- Create NPS Policies for 802.1X Wireless using a Wizard
Register NPS in Active Directory Domain Services
You can use this procedure to register a server running Network Policy Server (NPS) in Active Directory Domain Services (AD DS) in the domain where the NPS is a member. For NPSs to be granted permission to read the dial-in properties of user accounts during the authorization process, each NPS must be registered in AD DS. Registering an NPS adds the server to the RAS and IAS Servers security group in AD DS.
Membership in Domain Admins, or equivalent, is the minimum required to complete this procedure.
To register an NPS in its default domain
On your NPS, in Server Manager, click Tools, and then click Network Policy Server. The NPS snap-in opens.
Right-click NPS (Local), and then click Register Server in Active Directory. The Network Policy Server dialog box opens.
In Network Policy Server, click OK, and then click OK again.


