
sonicwall:hard_disk:how_to_expand_the_hard_drive_of_a_virtual_appliance
This is an old revision of the document!
How To Expand The Hard Drive Of A Virtual Appliance
DESCRIPTION:
This article will explain how to expand the logical volume size of a Virtual appliance to grow beyond the 250 GB and 950 GB OVA templates provided on MySonicWall.com. This process does not overwrite the pre-existing data, it will add on more space to the pre-existing Hard Drive.
*This process should not be used to expand the volume of Flow Server agents, or GMS 9.0 deployments installed with Flow Based reporting.
*This process should not be used on GMS versions 8.1 or older. Please upgrade to minimum GMS version 8.2 prior to performing these steps.
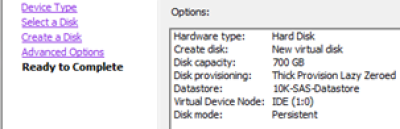
ADD A NEW VIRTUAL HARD DRIVE
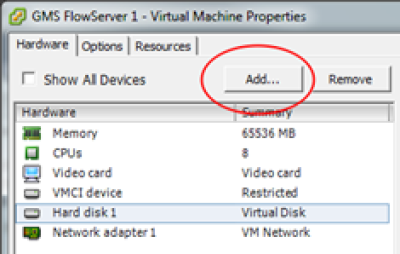
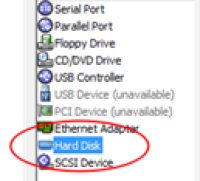
1. Turn off the Virtual Appliance
2. Log into the VMware Web Client or vSphere Client
3. Select Edit Settings for the Virtual Appliance
4. Click the Add button, and select the Hard Disk as the device type then select Next
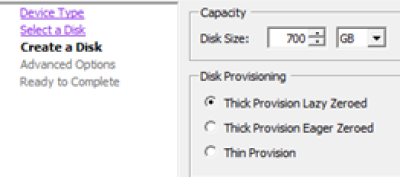
5. Input the size of the disk equal to the amount you would like to expand and select Thick Provision Lazy Zeroed then select next
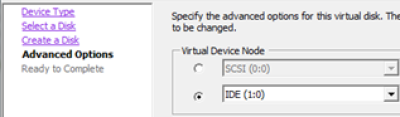
6. Check the radial for the appropriate drive type (match the drive type, SCSI or IDE, currently in use on the Virtual Appliance)
7. Select Finish and turn on the Virtual Machine
EXPAND THE VIRTUAL HARD DRIVE
1. Contact Technical Support to get the Root SSH password Best method is to open a Web ticket requesting Root SSH with this KB ID in the Title
2. Check that the disk has been partition by running (should be listed as /dev/sdb1): fdisk -l
sonicwall/hard_disk/how_to_expand_the_hard_drive_of_a_virtual_appliance.1613507009.txt.gz · Last modified: 2021/02/16 15:23 by dgonzalez