This is an old revision of the document!
Table of Contents
Managing Certificates
The controller is designed to provide secure services through the use of digital certificates. Certificates provide security when authenticating users and computers and eliminate the need for less secure password-based authentication.
There is a default server certificate installed in the controller to demonstrate the authentication of the controller for captive portal and WebUI management access. However, this certificate does not guarantee security in production networks. Arubastrongly recommends that you replace the default certificate with a custom certificate issued for your site or domain by a trusted Certificate Authority (CA). This section describes how to generate a Certificate Signing Request (CSR) to submit to a CA and how to import the signed certificate received from the CA into the controller.
The controller supports client authentication using digital certificates for specific user-centric network services, such as AAA FastConnect, VPN (see Virtual Private Networks), and WebUI and SSH management access. Each service can employ different sets of client and server certificates.
During certificate-based authentication, the controller provides its server certificate to the client for authentication. After validating the controller’s server certificate, the client presents its own certificate to the controller for authentication. To validate the client certificate, the controller checks the certificate revocation list (CRL) maintained by the CA that issued the client certificate. After validating the client’s certificate, the controller can check the user name in the certificate with the configured authentication server (this action is optional and configurable).
About Digital Certificates
Clients and the servers to which they connect may hold authentication certificates that validate their identities. When a client connects to a server for the first time, or the first time since its previous certificate has expired or been revoked, the server requests that the client transmit its authentication certificate. The client’s certificate is then verified against the CA which issued it. Clients can also request and verify the server’s authentication certificate. For some applications, such as 802.1x authentication, clients do not need to validate the server certificate for the authentication to function.
Digital certificates are issued by a CA which can be either a commercial, third-party company or a private CA controlled by your organization. The CA is trusted to authenticate the owner of the certificate before issuing a certificate. A CA-signed certificate guarantees the identity of the certificate holder. This is done by comparing the digital signature on a client or server certificate to the signature on the certificate for the CA. When CA-signed certificates are used to authenticate clients, the controller checks the validity of client certificates using certificate revocation lists (CRLs) maintained by the CA that issued the certificate.
Digital certificates employ public key infrastructure (PKI), which requires a private-public key pair. A digital certificate is associated with a private key, known only to the certificate owner, and a public key. A certificate encrypted with a private key is decrypted with its public key. For example, party A encrypts its certificate with its private key and sends it to party B. Party B decrypts the certificate with party A’s public key.
Obtaining a Server Certificate
Best practices is to replace the default server certificate in the controller with a custom certificate issued for your site or domain by a trusted CA. To obtain a security certificate for the controller from a CA:
1. Generate a Certificate Signing Request (CSR) on the controller using either the WebUI or CLI.
2. Submit the CSR to a CA. Copy and paste the output of the CSR into an email and send it to the CA of your choice.
3. The CA returns a signed server certificate and the CA’s certificate and public key.
4. Install the server certificate, as described in Importing Certificates.
In the WebUI
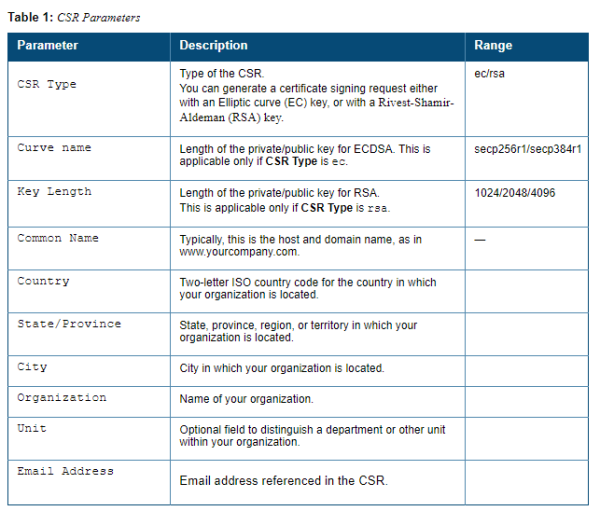
1. Navigate to the Configuration > Management > Certificates > CSR page.
2. Enter the following information:
3. Click Generate New.
4. Click View Current to display the generated CSR. Select and copy the CSR output between the BEGIN CERTIFICATE REQUEST and END CERTIFICATE REQUEST lines, paste it into an email and send it to the CA of your choice.
In the CLI
1. Run the following command: crypto pki csr {rsa key_len <key_val> |{ec curve-name <key_val>} common_name <common_val> country <country_val> state_or_province <state> city <city_val> organization <organization_val> unit <unit_val> email <email_val>
2. Display the CSR output with the following command: show crypto pki csr
3. Copy the CSR output between the BEGIN CERTIFICATE REQUEST and END CERTIFICATE REQUEST lines, paste it into an email and send it to the CA of your choice.
Obtaining a Client Certificate
You can use the CSR generated on the controller to obtain a certificate for a client. However, since there may be a large number of clients in a network, you typically obtain client certificates from a corporate CA server. For example, in a browser window, enter http:<ipaddr>/crtserv, where <ipaddr> is the IP address of the CA server.
===== Importing Certificates =====
Use the WebUI or the CLI to import certificates into the controller.


