Table of Contents
Managing Certificates
The controller is designed to provide secure services through the use of digital certificates. Certificates provide security when authenticating users and computers and eliminate the need for less secure password-based authentication.
There is a default server certificate installed in the controller to demonstrate the authentication of the controller for captive portal and WebUI management access. However, this certificate does not guarantee security in production networks. Arubastrongly recommends that you replace the default certificate with a custom certificate issued for your site or domain by a trusted Certificate Authority (CA). This section describes how to generate a Certificate Signing Request (CSR) to submit to a CA and how to import the signed certificate received from the CA into the controller.
The controller supports client authentication using digital certificates for specific user-centric network services, such as AAA FastConnect, VPN (see Virtual Private Networks), and WebUI and SSH management access. Each service can employ different sets of client and server certificates.
During certificate-based authentication, the controller provides its server certificate to the client for authentication. After validating the controller’s server certificate, the client presents its own certificate to the controller for authentication. To validate the client certificate, the controller checks the certificate revocation list (CRL) maintained by the CA that issued the client certificate. After validating the client’s certificate, the controller can check the user name in the certificate with the configured authentication server (this action is optional and configurable).
About Digital Certificates
Clients and the servers to which they connect may hold authentication certificates that validate their identities. When a client connects to a server for the first time, or the first time since its previous certificate has expired or been revoked, the server requests that the client transmit its authentication certificate. The client’s certificate is then verified against the CA which issued it. Clients can also request and verify the server’s authentication certificate. For some applications, such as 802.1x authentication, clients do not need to validate the server certificate for the authentication to function.
Digital certificates are issued by a CA which can be either a commercial, third-party company or a private CA controlled by your organization. The CA is trusted to authenticate the owner of the certificate before issuing a certificate. A CA-signed certificate guarantees the identity of the certificate holder. This is done by comparing the digital signature on a client or server certificate to the signature on the certificate for the CA. When CA-signed certificates are used to authenticate clients, the controller checks the validity of client certificates using certificate revocation lists (CRLs) maintained by the CA that issued the certificate.
Digital certificates employ public key infrastructure (PKI), which requires a private-public key pair. A digital certificate is associated with a private key, known only to the certificate owner, and a public key. A certificate encrypted with a private key is decrypted with its public key. For example, party A encrypts its certificate with its private key and sends it to party B. Party B decrypts the certificate with party A’s public key.
Obtaining a Server Certificate
Best practices is to replace the default server certificate in the controller with a custom certificate issued for your site or domain by a trusted CA. To obtain a security certificate for the controller from a CA:
1. Generate a Certificate Signing Request (CSR) on the controller using either the WebUI or CLI.
2. Submit the CSR to a CA. Copy and paste the output of the CSR into an email and send it to the CA of your choice.
3. The CA returns a signed server certificate and the CA’s certificate and public key.
4. Install the server certificate, as described in Importing Certificates.
In the WebUI
1. Navigate to the Configuration > Management > Certificates > CSR page.
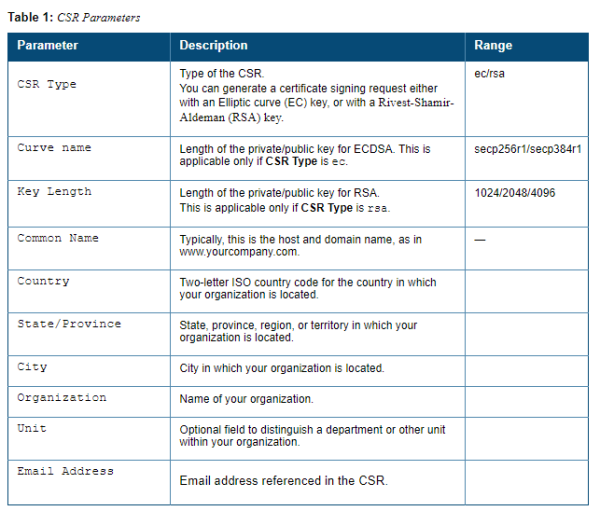
2. Enter the following information:
3. Click Generate New.
4. Click View Current to display the generated CSR. Select and copy the CSR output between the BEGIN CERTIFICATE REQUEST and END CERTIFICATE REQUEST lines, paste it into an email and send it to the CA of your choice.
In the CLI
1. Run the following command: crypto pki csr {rsa key_len <key_val> |{ec curve-name <key_val>} common_name <common_val> country <country_val> state_or_province <state> city <city_val> organization <organization_val> unit <unit_val> email <email_val>
2. Display the CSR output with the following command: show crypto pki csr
3. Copy the CSR output between the BEGIN CERTIFICATE REQUEST and END CERTIFICATE REQUEST lines, paste it into an email and send it to the CA of your choice.
Obtaining a Client Certificate
You can use the CSR generated on the controller to obtain a certificate for a client. However, since there may be a large number of clients in a network, you typically obtain client certificates from a corporate CA server. For example, in a browser window, enter:

Importing Certificates
Use the WebUI or the CLI to import certificates into the controller.
You can import the following types of certificates into the controller:
- Server certificate signed by a trusted CA. This includes a public and private key pair.
- CA certificate used to validate other server or client certificates. This includes only the public key for the certificate.
- Client certificate and client’s public key. (The public key is used for applications such as SSH which does not support X509 certificates and requires the public key to verify an allowed certificate.)
Certificates can be in the following formats:
- X509 PEM unencrypted
- X509 PEM encrypted with a key
- DER
- PKCS7 encrypted
- PKCS12 encrypted
In the WebUI
1. Navigate to the Configuration > Management > Certificates > Upload page.
2. For Certificate Name, enter a user-defined name.
3. For Certificate Filename, click Browse to navigate to the appropriate file on your computer.
4. If the certificate is encrypted, enter the passphrase.
5. Select the Certificate Format from the drop-down menu.
6. Select the Certificate Type from the drop-down menu.
7. Click Upload to install the certificate in the controller.
In the CLI
Use the following command to import CSR certificates:
crypto pki-import {der|pem|pfx|pkcs12|pkcs7} {PublicCert|ServerCert|TrustedCA} <name>
The following example imports a server certificate named cert_20 in DER format:
crypto pki-import der ServerCert cert_20
Viewing Certificate Information
In the WebUI, the Certificate Lists section of the page lists the certificates that are currently installed in the controller. Click View to display the contents of a certificate.
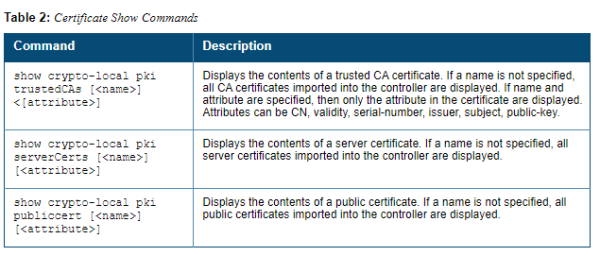
To view the contents of a certificate with the CLI, use the following commands:
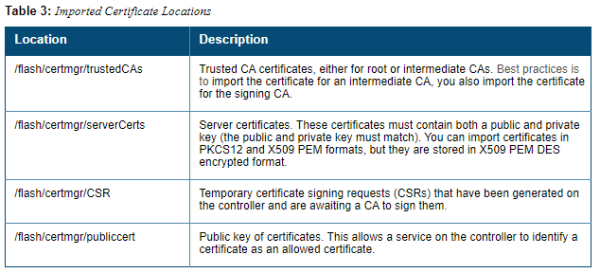
Imported Certificate Locations
Checking CRLs
A CA maintains a CRL that contains a list of certificates that have been revoked before their expiration date. Expired client certificates are not accepted for any user-centric network service. Certificates may be revoked because certificate key has been compromised or the user specified in the certificate is no longer authorized to use the key.
When a client certificate is being authenticated for a user-centric network service, the controller checks with the appropriate CA to make sure that the certificate has not been revoked.
Certificate Expiration Alert
The certificate expiration alert sends alerts when installed certificates, which correspond to trust chains, OCSP responder certificates, and any other certificates installed on the device. By default, the system sends this alert 60 days before the expiration of the installed credentials. This alert is then repeated periodically on a weekly or biweekly basis. This alerts consist of two SNMP traps:
- wlsxCertExpiringSoon
- wlsxCertExpired
Chained Certificates on the RAP
Chained certificates on the RAP (that is, certificates from a multi-level PKI) need to be in a particular order inside the file. The RAP’s certificate must be first, followed by the certificate chain in order, and then followed by the private key for the certificate. For example, with a root CA, a single intermediate CA, and a root CA, the PEM or PKCS12 file must contain the following parts, in this order:
- RAP Certificate
- Intermediate CA
- Root CA
- Private key
Support for Certificates on USB Flash Drives
This release now supports the USB storing of the RAP certificate. This ensures that the RAP certificate is activated only when the USB with the corresponding certificate is connected to the RAP. Likewise, the RAP certificate is deactivated when the USB is removed from the RAP. In this case, the USB that is connected to the RAP is an actual storage device and does not act as a 3G/4G RAP.
The RAP supports only PKCS12-encoded certificates that are present in the USB. This certificate contains all the information that is required for creating the tunnel including the private key, RAP certificate with the chain of certificates and the trusted CA certificate. There is a limit of three supported intermediate CAs and the common name for the RAP certificate must be the MAC address of the RAP in the colon format.
Marking the USB Device Connected as a Storage Device
If the AP provisioning parameter “usb-type” contains the value “storage,” this indicates that the RAP will retrieve certificates from the connected USB flash drive.
RAP Configuration Requirements
The RAP needs to have one additional provisioning parameter, the pkcs12_passphrase, which can be left untouched or can store an ACSII string. The string assigned to this parameter is used as the passphrase for decoding the private key stored.
When the RAP successfully extracts all the information including the CA certificate, the RAP certificate and the RAP private key using the passphrase from the provisioning parameter, it successfully establishes the tunnel.


