Table of Contents
SYSTEM COMMANDS
system apps-access-reset
Use the system apps-access-reset command to reset the access control restrictions for Policy Manager.
Syntax
system apps-access-reset
Example
system boot-image
Use the system boot-image command to set system boot image control options.
Syntax
system boot-image [-l] [-a <version>]
The following table describes the required and optional parameters for the system boot-image command:
Table 1: Boot-Image Command Parameters
Example
The following example sets the system boot image control options:
[appadmin]# system boot-image -l
system cleanup
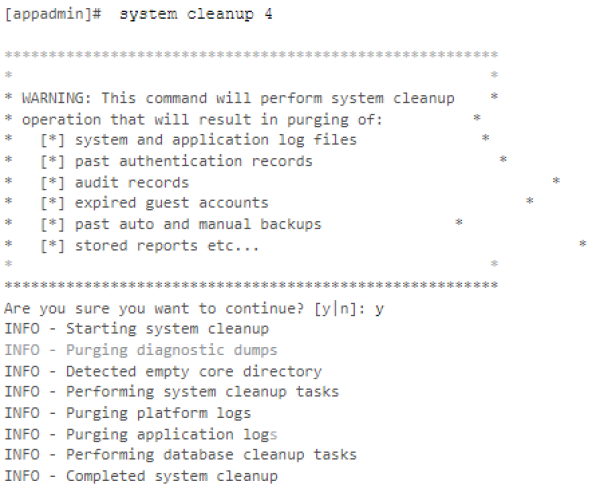
Use the system cleanup command to perform a system cleanup operation that purges the following records:
* System and application log files
* Past authentication records
* Audit records
* Expired guest accounts
* Past auto and manual backups
* Stored reports
Syntax
system cleanup <num_days
The following table describes the required parameter for the system cleanup command:
Table 2: System Cleanup Command Parameter
Example
system create-api-client
Use the system create-api-client command create a new API client.
Syntax
system create-api-client <Client_ID> <Client_Secret>
Example
The following example creates an API client and specifies the client ID and client secret:
[appadmin]#system create-api-client Win.139 college52
system export-endpoints-csv
use this command to export endpoints and endpoint profile details to a zip file that can be downloaded from Admin UI - Backup files under Administration > Server Manager > Local Shared Folders. When using an XML file to export or import a very large number of endpoints, performance is sometimes degraded.
system factory-reset
The system factory-reset command restores a ClearPass hardware appliance to factory defaults. This command is available only to the appadmin user.
The system factory-reset command essentially consists of two operations:
* Resets all ClearPass configurations in the current partition only, including Policy Manager server settings, all ClearPass Guest, Onboard and extensions, Active Directory domain settings, NTP settings, hostname, network settings, and date, time, and password settings.
* Cleans and resets ClearPass logs and configuration files, including those for ClearPass Guest.
When running the system factory-reset in a ClearPass cluster:
* If the current node is a Publisher node, running this command will drop it from the cluster. The Standby Publisher node then becomes the Publisher.
* If the current node is a Subscriber node, it will be dropped from the cluster, and will become a stand-alone node.
After successful configuration and reboot, you will be presented with the bootstrap configuration screen, where you will have to reset all the ClearPass parameters.
Example
The following example restores a ClearPass hardware appliance to factory defaults:
[appadmin]# system factory-reset
system install-image
The system install-image command installs a fresh image of the major product version specified in the second partition of a ClearPass hardware appliance.
This command is available only for the appadmin user.
After successful execution of the system install-image command, the system will reboot and you will return to the installed image.
After successful configuration and reboot, you will be presented with the bootstrap configuration screen, where you will have to reset all the ClearPass parameters.
You can apply the system install-image command in the following ways:
Table 3: System Install-Image Command Methods
Example
[appadmin]#system install-image CPPM-x86_64-6.X.Y.Z-<any-image>.signed.tar
- X.Y.Z stands for a specific patch release version.
- <any-image> stands for the description of the patch.
- signed.tar is common nomenclature for all types of updates.
system morph-vm
Use the system morph-vm command to convert an evaluation virtual machine (VM) to a production virtual machine. With this command, licenses are still required to be installed after the morph operation is completed.
To convert an evaluation virtual machine to a production virtual machine:
1. Determine the type of the appliance to which you want to morph your evaluation virtual machine.
2. Procure the license for the target virtual appliance.
3. Shut down the virtual machine.
4. Determine the required capacity of an additional hard disk and attach it to the target virtual appliance.
5. Adjust the CPU and Memory settings for the evaluation virtual machine to match the target virtual appliance.
6. Boot the virtual machine.
7. Execute the system morph-vm command.
The configuration data from the evaluation virtual machine will migrate to the newly-attached disk. The node will reboot as a virtual machine of the selected appliance model.
8. Log in to the user interface and enter the permanent license.
The evaluation virtual machine is now a production virtual machine.
Syntax
system morph-vm <C1000V | C2000V | C3000V>
The following table describes the parameters for the system morph-vm command:
Table 4: System Morph-VM Command
Example
The following example converts an evaluation virtual machine to a production C3000V virtual appliance:
[appadmin]# system morph-vm C3000V
system patch-rollback
The system patch-rollback command allows a user with appadmin credentials to revert to the most recent ClearPass installed version. For example, if a ClearPass system is at 6.7.1 and cumulative update 6.7.x is applied, ClearPass can be reverted to 6.7.1 through the system patch-rollback command.
This command can also be used if there is a problem after the patch update process—for example, if an issue is identified in production that was not identified during testing, resulting in a degradation of capabilities.
Important Points
When issuing the system patch-rollback command, keep in mind the following points:
- Patch rollback is supported only for ClearPass versions 6.7 and above.
- The system patch-rollback command reverts only the most recently installed cumulative patch update within the major version. After the cumulative patch is reverted, the user will be in the patch version that was installed prior to the patch update.
- Although you can only roll back to the last version that was installed, if multiple hotfix patches are included within the cumulative patch version you are rolling back from, then you can roll back multiple hotfix patches, one at a time, to a specific hotfix within the current version. To roll back to the previously installed version, you must first roll back each intervening hotfix patch.
- As best practice, users should always back up all data before proceeding with an update.
- This command can also be used at the cluster level. In this case, system patch-rollback must be run individually on each appliance in the cluster within 24 hours after the rollback in order to maintain the cluster status.
- Any custom skins that are installed in the current version are retained after the rollback to the earlier version.
- System rollback events are logged in the Event Viewer.
Syntax
system patch-rollback
Example
For example, if ClearPass has been installed in the order 6.7.0 > 6.7.1 > 6.7.2, when the appadmin user executes the system patch-rollback command, the system will revert to a time just before ClearPass 6.7.2 was installed.
If, in this example, the installed 6.7.2 patch added an rpm-X, system patch-rollback deletes rpm-Y, and updates rpm-Z to rpm-Z+1 version. Then system patch-rollback deletes rpm-X, adds rpm-Y, and restores rpm-Z.
The system patch-rollback command can also be used at the cluster level, but this command must be run individually on all cluster nodes. For patch rollback across a cluster, the appadmin user must go to each ClearPass server in the cluster to rollback the last applied patch.
system refresh-license
Use the system refresh-license command to refresh the license count information.
Syntax
system refresh-license
Example
system refresh-network
Use the system refresh-network command to refresh the newly added or removed network adapters in ClearPass so that they are reflected in the system. This command also enforces network adapter ordering and associates the lower-order MAC address to eth0 and the next higher-order MAC address to eth1, and so on. Ensure that you have the console session available.
The system refresh-network command is useful when you bring up a virtual machine without one or more of the network interface cards (NICs) and you then add them at a later stage. This command is required when you delete NICs and add them back into the system (VMware ESXi may generate new MAC addresses as a result).
For the network refresh to take effect, you must reboot the ClearPass server.
Syntax
system refresh-network
This command takes no arguments.
system reset-server-certificate
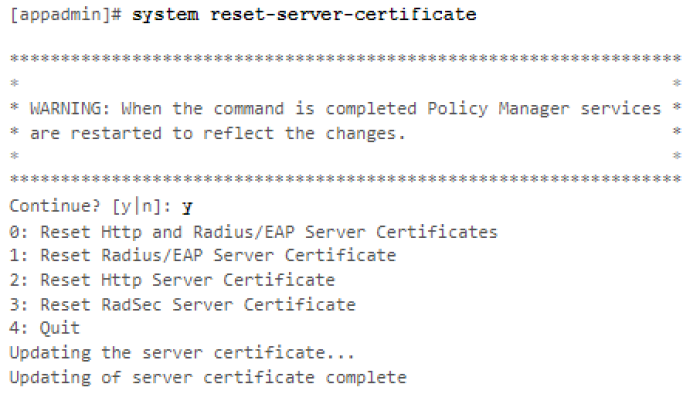
Use the system reset-server-certificate command to reset the HTTP server certificate or RADIUS/EAP server certificate or both.
After executing the command, the Policy Manager services are restarted to reflect the changes.
Syntax
system reset-server-certificate
Example
system restart
Syntax
system restart
Example
system shutdown
Syntax
[appadmin]# system shutdown
Example
system sso-reset
Use the system sso-reset command to reset the Single Sign-On (SSO) configuration.
Syntax
system sso-reset
system start-rasession
Use the system start-rasession command to start a Remote Assistance (RA) session.
Syntax
system start-rasession [duration_hours | duration_mins | contact_id | cppm_server_ip]
The following table describes the parameters for the system start-rasession command
Table 5: System Start Remote Assistance Session Command Parameters
system status-rasession
Use the system status-rasession command to view the status of a Remote Assistance session.
Syntax
system status-rasession <session_id>
Example
The following example displays the status of a Remote Assistance session 3001:
[appadmin]# system status-rasession 3001
system terminate-rasession
Use the system terminate-rasession command to terminate a running Remote Assistance session.
Syntax
system terminate-rasession <session_id>
Example
The following example terminates a running RemoteAssist session 3001:
[appadmin]# system terminate-rasession 3001
system update
The system update command provides options to manage system patch updates.
Syntax
system update [-i [-f] <user@hostname:/<filename> | http://hostname/<filename»]
system update [-f]
system update [-l]
The following table describes the required and optional parameters for the system update command:
Table 6: System Update Command Parameters
Example
The following example of the system update command will reinstall the patch if necessary and list the patches currently installed on the ClearPass server:
[appadmin]# system update -f -l
system upgrade
The system upgrade command upgrades the system. This command provides you with the following system upgrade options:
- From a Linux server
- From a Web server
- Performing an offline upgrade
Syntax
system upgrade <session_id>
Syntax
- Upgrading from a Linux server
system upgrade user@hostname:/<filepath> [-w] [-l] [-L]
- Upgrading from a Web server
system upgrade http://hostname/<filepath> [-w] [-l] [-L]
- Performing an offline upgrade
system upgrade <filepath> [-w] [-l] [-L]
Table 7: System Upgrade Command Parameters
Example 1: Upgrading from a Linux Server
To upgrade the Policy Manager image from a Linux server:
1. Upload the upgrade image to a Linux server.
2. Use the following syntax to upload the upgrade image:
system upgrade user@hostname:/<filepath> [-w] [-l] [-L]
For example:
[appadmin]# system upgrade admin@sun.us.arubanetworks
Example 2: Upgrading from a Web Server
To upgrade the Policy Manager image from a Web server:
1. Upload the upgrade image to a Web server.
2. Use the following syntax to upload the upgrade image:
system upgrade http://hostname/<filepath> [-w] [-l] [-L]
For example:
[appadmin]# system upgrade http://sun.us.arubanetworks.com/downloads/PolicyManager-x86-64-upgrade-71.tgz
Example 3: Performing an Offline Upgrade
To perform an offline upgrade:
1. Log in to the Aruba Support Center and select the Download Software tab.
2. Navigate to the ClearPass > Policy Manager > Current Release folder > Upgrade folder. The Upgrade page opens.
3. In the Description/Remarks section, click the link for the appropriate upgrade. The upgrade file is uploaded to your local system.
4. Navigate to the ClearPass Policy Manager Software Updates page at Administration > Agents and Software Updates > Software Updates.
5. In the Firmware & Patch Updates section of the Software Updates page, click the Import Updates button. The Import from File dialog opens.
6. Browse to the location of the upgrade file on your system, then click Import. The selected upgrade file is uploaded to the ClearPass Policy Manager.
7. Log in to the Policy Manager command line interface (CLI) with the following user name: appadmin.
8. Initiate the upgrade process by entering the following command:
system upgrade <filepath> [-w] [-l] [-L]
For example:
[appadmin]# system upgrade CPPM-upgradeimage.bin
9. After the upgrade process is complete, restart the machine by issuing the following command in the CLI: system restart
The Policy Manager restarts and boots up to the most recent version of ClearPass Policy Manager.


